Plasticworks - Plastics, Fiberglass and More
Follow us on Facebook
  • Home
  • AC adapters
  • Locations
  • Products and Services
  • Covid-19 Shields
  • Gallery
  • Fiberglass
  • Links
  • Graham's Blog
  • Dennis's Blog

Rot Fix During Reno's

3/31/2011

 
Reno Rot

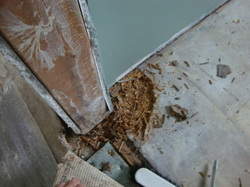
 The latest project at our place, a bathroom reno.  Reno’s always produce something unexpected, this time it was dry rot at the hinge side of the bathroom door.  It turns out water had been coming down the furnace B vent, and then continuing downward behind the door casing until it pooled on the floor, under the carpet, never leaving a visible trace, but causing a pocket of dry rot in the plywood floor.  The floor in this area consisted of 5/8 plywood, overlain by a sub floor of 3/8 plywood.  The dry rot had consumed the 3/8 plywood but had not penetrated through the 5/8 plywood.  Plus the area of dry rot was located in an area that would not be subject to the weight of traffic, or any other stress for that matter.  Thus I felt a non structural repair would suffice.
Picture
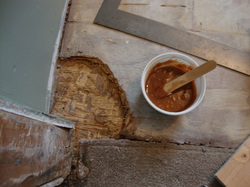
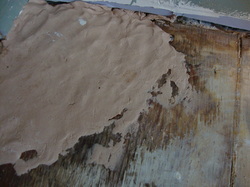
Looks pretty ugly after a couple bangs to loosen the rotted wood.
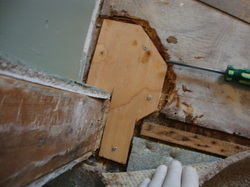
First I scraped away the dry rot.  I was not that thorough on this, I hate working slowly, but I did get most of it.  The area removed was very irregular in shape as well as in depth.  As a first step in filling the cavity I cut a piece of 3/8 plywood roughly the shape of the cavity, but trimming it back so that it sat in the cavity but did not project above the surrounding floor level.  Next I mixed up some epoxy, I used Cold Cure, and thickened it with wood flour.  I could just as easily have thickened the epoxy with cab o sil or glass bubbles or micro fibers, but wood flour was what I had at hand.  I then spread the thickened epoxy in the bottom of the cavity and pressed in the 3/8 cut to shape plywood, additionally secured with screws.
Picture
The cavity cleaned of rot, thickened epoxy ready to go in.
Picture
Plywood set into the thickened epoxy, and held in place with screws.
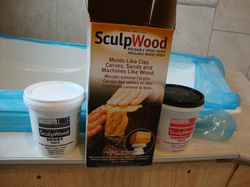
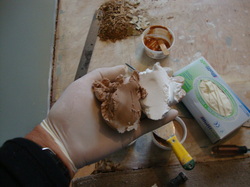
The next step is to fill the cavity up to the level of the surrounding floor.  PlasticWorks sells a product called SculptWood, made by System Three Resins, the same company that makes Cold Cure.  SculptWood is a two part epoxy putty with a mixing ratio of 1:1.  Because the material is so thick I could not think of an easy way of measuring the parts to get an equal amount of each.  So, I just scooped out a ball of part A, and by eye scooped out a matching ball of part B.  By hand, using rubber gloves, I kneaded and mushed the two parts together until I had a uniform consistent colour.  In my first attempt to apply this mixture to the cavity and to cover the 3/8 plywood I used a metal spatula, a wide putty knife.  It did not work.  As soon as the spatula passed over an area the SculptWood underneath would lift up and curl back toward the top of the spatula.  I abandoned the spatula and resorted to using my hands to press the SculptWood into the cavity and on to the plywood, using a straight edge, my level, to check that the SculptWood had filled the cavity to approximately the level of the surrounding floor.  Since the floor was to be finished with ceramic tile I felt the thick mortar under the tile would make further leveling unnecessary. 
Picture
SculptWood
Picture
Part A and part B ready to be mixed. The spatula is in the background.
Picture
The finished repair, ready for ceramic tile.
So the job was complete, a good time to now read the SculptWood directions!  And I found that it is recommended that SculptWood be pressed in place and rough shaped by hand.  Once the material has hardened it can be brought to its final shape using regular wood tools, rasp, chisel etc.
 
Because of the way the SculptWood had peeled off the plywood when I applied it with the spatula I was concerned about how well this material would adhere to the plywood.  Thus, as a test, I pressed a lump of SculptWood onto a scrap of plywood and let it set. My concerns were unfounded, the lump of SculptWood could not be removed from the plywood!
 
All in all I was quite pleased with the way this repair went and I am confidant that the Cold Cure, plywood, SculptWood repair will last as long as the house will.

A project from the past: New Console

3/18/2011

 
New Console  

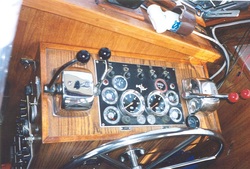
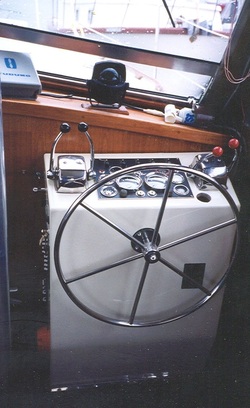
This is reaching back in time to my previous boat, a 36 ft. trawler. This was an older boat, and while it had received good care over the years parts of it were dated or just plain tired. This was my diagnosis of the lower station console. I wanted a fresh look rather than any change in function. I resolved to build a new console. The console held the engine controls, engine gauges, steering wheel, various other controls and gauges and AC and DC fuse panels.   
Picture
The original console, fully functional but dated and lacking any snap.
There really was not the option of changing the size or shape or funtion of the console. It was a question of duplicating it in fiberglass. If you look back, I have an entry discussing reworking the propane system of my existing boat and the method of making a mold. I used the same technique here. I created a female mold of melamine particle board, where the inside of the mold duplicated the outside of the control console. This was a very easy 4 piece mold. Next I used a bondo type product to round the corners inside the mold. That completed the mold. Next I painted the inside of the mold with 2 layers of white gel coat, and once that had cured began laying up fiberglass. I laid in 1 oz mat, followed by 18 oz roving and did this twice (maybe 3 times, I kept no notes). The new fiberglass console was then removed from the mold, trimmed, bondo that pulled away from the mold removed, and the entire unit sanded ready for painting. As an aside here, I get a lot of people working on a project like this who want the gel coat to be the finished surface. It is just not worth the effort. Your mold must be flawless, and for a one off it is just not worth the effort. Further your skill levels are probably just not up to it. To be a fiberglass mold maker requires skills built up over an extended time with much trial and error. There is a reason fiberglass molds are expense and a reason mold makers are reluctant to share the knowledge they have painfully accumulated. Go the paint route and save yourself a lot of heartache. We all know how to sand.   
Picture
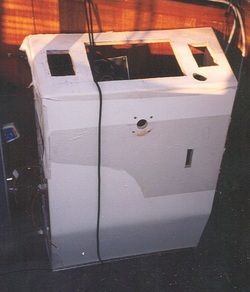
This is the new console set in place. Holes have been cut for steering, controls and gauges. Top has been masked off to prevent scratching during insulation.
Once the fiberglass console was complete, but before the holes were cut, I attached plywood panels to the inside to the console. The plywood was not fitted to be seamless, it was just 4 pieces of plywood cut to shape, pushed close together, and attached to the inside of the console with thickened epoxy. The fiberglass looks thick in the above picture because of the plywood backing on the inside. The plywood backing was necessary to hold screws from the outside, and more importantly to allow easy anchoring of wires, cables etc on the inside.   
Picture
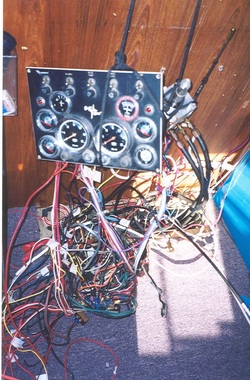
This is the birds nest of wiring and cables that was contained in the console, all had to be sorted out and laid out in some way on the bulkhead or the inside of the console. The heavy cables to the right are the hydraulic steering cables, but I cannot even see the engine controls in this chaos. I love this picture.
Picture
Here is the new console in place and pretty well finished. There is a piano hinge at the bottom that allows the console to fold flat to the floor, so you have reasonable access for all the wiring work.
Picture
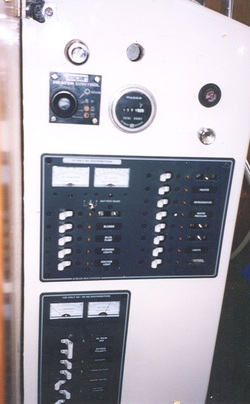
New AC and DC electrical panels on the port side of the new console.
Picture
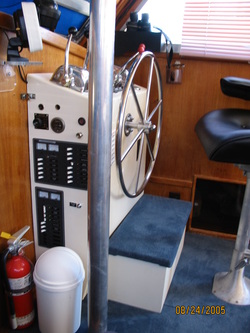
The console finished, fully functional, and dressed up with a matching foot rest. Upholstery of the captain’s chair was changed from white to black, keeping the white clean drove me to drink. Note plexi GPS holder to right, ABS binoculars holder to left, and dark smoked acrylic sliding doors to storage area at bottom. All with material from PlasticWorks. Come see us!


Was it worth it? I think so. The salon certainly looked more modern, and all the old fuses had been upgraded to circuit breakers. And do not underestimate the satisfaction you will get every time you look at a completed project like this. I feel good just reliving it all as I write this.   

A project from the past: The cover up.

3/18/2011

 
 I came across some pictures of my previous boat, an older 36 ft. trawler. When you sat in the salon and looked across to the cabin entry door you were staring at a big ugly stain in the wood paneling at the corner of the door. The leak problem that caused the stain had long ago been solved, but the stain remained. I spent a long time staring at that stain and plotting how to get rid of it. This is what I ended up doing.

 Using 1/8 white ABS I fashioned a plate to cover the stain, including going around the door trim at the bottom. To this plate I then attached a 3 sided box, sized to fit a flashlight. The unit was then fastened to the wall covering the stain. Since the unit had a purpose, to hold the flashlight, it was not obvious that its real purpose was to cover the stain.

    About Dennis

    Dennis Facer is the father of Greg and Graham Facer (who run Plasticworks).  He is occasionally retired but loves to spend time working on this or that.  You can often see his projects or the results out at the shops.

    These are some of his projects.

    Archives

    July 2023
    March 2023
    December 2013
    September 2013
    June 2013
    August 2012
    March 2011
    June 2010
    November 2009
    March 2009
    December 2008
    December 2007
    November 2007
    July 2007
    June 2007
    February 2006

    Categories

    All

    RSS Feed

Need it Shipped?

We ship sheet goods and fabricated products all over the lower mainland and southern BC.  As well, we ship our brochure holders and Velcro® Brand products all over Canada.  If you can't make it in, give us a call and we'll work out a great shipping price to get what you need to you when you need it.