
Eliminating Stress and Covering Up
Coming off my swim grid at the stern is a ladder which gives access to the swim grid and back onto the rear deck. Right beside this ladder is my stern light post, attached to rear of the boat and reaching up into the air. The stern light post is just too easy to grab when you are using the ladder. This has led to stress cracks at the base of the light post, and as well the cracks have allowed rust from the set screws to follow the cracks down and spread out. So we have both a strength and an appearance problem.
Coming off my swim grid at the stern is a ladder which gives access to the swim grid and back onto the rear deck. Right beside this ladder is my stern light post, attached to rear of the boat and reaching up into the air. The stern light post is just too easy to grab when you are using the ladder. This has led to stress cracks at the base of the light post, and as well the cracks have allowed rust from the set screws to follow the cracks down and spread out. So we have both a strength and an appearance problem.
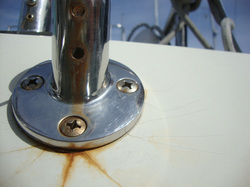
The cracks and rust stains are quite visible here.
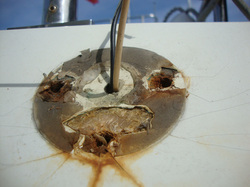
When the base of the light post was removed you can see the damage done to the gel coat around the bolt holes where the stress would be greatest
To cover up the worst of the cracks and rust stains, and to strengthen the whole area, I thought I would put a fiberglass plate on the outside and under the base of the stern light, and also put a plastic backing plate on the inside where the bolts went through.
I had previously made some flat fiberglass panels which I knew would come in handy for various projects. The panels were made using a sheet of melamine fiberboard as a layup table. Fiberglass resin will not stick to the melamine so no waxing or prep is needed. These panels were made by painting on a layer of white unwaxed gel coat, letting that set up, and then overlaying this with 2 layers of 1.5 oz fiberglass mat. However these stock panels were quite flexible, thus I added a layer of combo mat to stiffen up the fiberglass for this project.
I had previously made some flat fiberglass panels which I knew would come in handy for various projects. The panels were made using a sheet of melamine fiberboard as a layup table. Fiberglass resin will not stick to the melamine so no waxing or prep is needed. These panels were made by painting on a layer of white unwaxed gel coat, letting that set up, and then overlaying this with 2 layers of 1.5 oz fiberglass mat. However these stock panels were quite flexible, thus I added a layer of combo mat to stiffen up the fiberglass for this project.
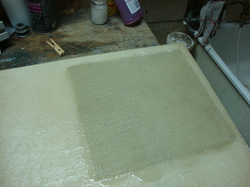
Fiberglass panel with addition of combo mat. My top plate will be cut from this strengthened area.
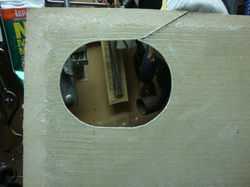
Fiberglass panel after cutting out the shape of the top plate.
I had made a paper template of the shape I wanted, which was then transferred to the fiberglass panel and cut out using a jig saw. The edges of the oval shaped cutout were then filed and sanded to make them smooth and to give a small radius on the top edge. (This is where I say –I wish I had taken more pictures.) Next the fiberglass shape was painted, using Endura, a high end two part paint. The colour is Oyster White, which is a close match to the Tolly off-white gel coat. The paint was left over from my cabin door project, described earlier, although for the door project I had a body shop apply the paint. Here I just brushed on a heavy coat and let it self-level.
The base of the light post was then used as a template to match drill holes in the fiberglass panel. A hole was also drilled for the wires to come through. For the inside backing plate I used a piece of 1/4” ABS, a circle 1” in diameter bigger than the base of the light post. In the ABS I then drilled a hole for the wire and one bolt hole. To the back of the fiberglass plate I applied some caulking around all the holes, which along with some masking tape held the plate to the stern of the boat. I then inserted one bolt through the metal base, through the fiberglass plate, through the wall of the boat, and eventually through the ABS backing plate on the inside of the boat, and put on a nut and washer. With everything now all lined up I could drill through the existing holes from the outside to make the final 2 holes in the ABS inside backing plate. Now everything could be tightened up, wiring completed, and the light post reattached to the base.
The base of the light post was then used as a template to match drill holes in the fiberglass panel. A hole was also drilled for the wires to come through. For the inside backing plate I used a piece of 1/4” ABS, a circle 1” in diameter bigger than the base of the light post. In the ABS I then drilled a hole for the wire and one bolt hole. To the back of the fiberglass plate I applied some caulking around all the holes, which along with some masking tape held the plate to the stern of the boat. I then inserted one bolt through the metal base, through the fiberglass plate, through the wall of the boat, and eventually through the ABS backing plate on the inside of the boat, and put on a nut and washer. With everything now all lined up I could drill through the existing holes from the outside to make the final 2 holes in the ABS inside backing plate. Now everything could be tightened up, wiring completed, and the light post reattached to the base.
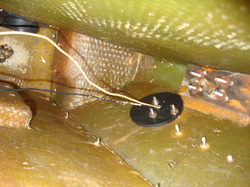
Here is what it looks like on the inside where you can see the ABS backing plate.
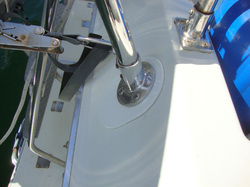
And here is what the finished project looks like from the outside.
By the way, this project was only possible because of the air vent on the rear side of the boat. I was able to remove the vent and the hole was just large enough and close enough for my arm to reach the bolts from the inside, but it was a stretch. And I will avoid going into detail about assembling it without the wires going through and other similar distractions, such as my glasses falling overboard, and …………

The well placed air vent. Stern light post near top of picture.
 RSS Feed