
Propane Box
Warning: What follows is a description of what I did. It is not a recommendation, has never been inspected, may not be legal or meet any required codes.
This was an early project, but one of the most involved.
Morning Star has a propane stove. The tank was located under the console of the upper bridge deck. The tank was old and rusty and not fastened down. As well, over time holes had been drilled from below to route wires for radios, antenna cables and miscellaneous other add ons. Propane is heavier than air. Thus any leaks in the vicinity of the tank could find their way into the cabin.
I was going to correct these problems by putting a new tank in a sealed box with a vent line so that any escaping gas would be vented over board. It sounds simple but there were many little problems to be solved along the way.
The box and the tank. While there is lots of space under the console the door into it is of limited size. Also the front to back distance is limited, so any size box would have to go in with a twist so it sat at an angle to the fore aft line of the boat. A regular propane tank would not work. After much searching I found a very expensive aluminum horizontal tank that would fit the box size limitations. The final size of the box was now worked out. The box had to contain the tank, regulator, pressure gauge, solenoid, and allow for the propane to exit the box to the stove in a non leaking manner and for any propane within the box to be vented over board. The box would have a shoe box type lid, with a gasket, held on with bungee cords.
A female mold was constructed using melamine, the corners filleted with body filler, and then the fiberglass was laid in. Lay up consisted of 1.5 oz mat, 18 oz roving and 1.5 oz mat. The mold was then taken apart to remove the fiberglass box.
The filleting I had done was pretty rough so the corners were cleaned up and filled and smoothed. No one was going to see the box so I was not very concerned with appearance. Plywood strips were cut to hold the tank in place and Sikaflex was used to attach these to the bottom of the fiberglass box. Sikaflex was also used to attach plywood at one end of the box so the regulator could be attached without having bolts going through the box. The box was then drilled so a brass fitting could be inserted, sealed from both sides, the hose from the regulator attached at the inside and the outside connected via a flexible line to the line that ran to the stove. A second larger hole was drilled, a through hull fitting was installed, sealed from both sides, and a large hose attached outside the box and lead to an existing vent at the leading edge of the console. Single sided foam tape was used as a gasket on the inside of the lid.


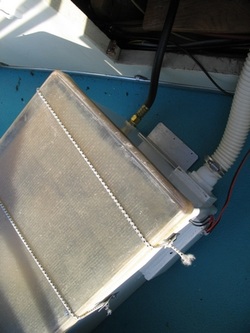
On the left the propane line going to the boat system, the large through hull fitting and hose to take any leaking propane over board, oh yes and the electrical lines leading to the solenoid. Bungee cords holding down the lid.
The ins and outs of things:
It became apparent during the above process that the only way to get the tank in and out of the box was while it was outside the console. Thus the supply and vent hoses had to be long enough for the box to be taken out from under the console without having to remove them each time. Taking the box from under the console onto the deck so you could check the tank or remove it for refilling was difficult, you had limited leverage to lift it, were working on your knees in a tight space etc.
To make this easier I used some cut to size 2×4′s and plywood to raise the area where the box sat so that it could be slid out rather than having to be lifted out. To lock the box in place I attached aluminum angle to two sides of the box, with slots cut in the aluminum so hold downs could go through the slots and into threaded inserts set in the plywood. The aluminum was attached to the fiberglass box with Sikaflex. (Just an aside here. I have had Sikaflex affect some paint so that the Sikaflex and the paint just peel away from the substrate. My rule now is to apply Sikaflex only to gel coat or raw fiberglass.)
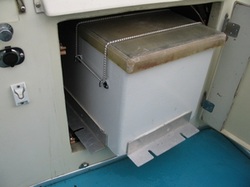
Box going in. It is a tight fit and at this point the box must start its twist to the left. Note aluminum hold down brackets.
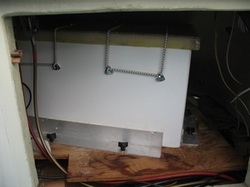
Box in place and locked down to the raised plywood shelf. The red and gold lines on the left are the control cables for speed and shifting. The white block of UHMW behind them protects them from being cut by the aluminum hold down when the box is going in and out. That is how tight this installation is.
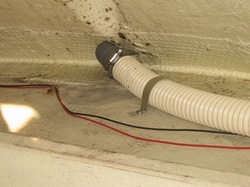
Under the upper console the vent hose from the propane box leads to an already installed vent. Any leaking propane will vent out above the front windows.
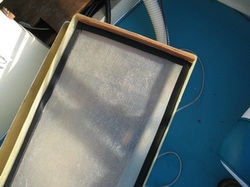
The box lid with the sealing gasket.
The verdict.
With a new tank, and all new fittings the chances of leaks are minimal. However I am quite convinced the set up will function as intended. The weakest point is probably the connection between the flexible hose leaving the box and the copper line that runs through the boat. I just have to be careful when removing the box that I do not pull it out too far and put stress on this joint. The foam tape used as a gasket in the lid seems to provide a good seal all around the edge of the box. The aluminum angle hold down system has survived some rough crossings and appears adequate to the job, and is fairly easy to position.
Yes the lid should be painted and also the plywood shelf, but I was so tired of this project by the time I finished I just closed the door and went cruising.
- Dennis Facer
 RSS Feed